
What the Claude Code VS Code extension actually is
Claude Code is Anthropic's agentic coding tool, the one that crossed $2.5B ARR by February 2026 and pulled 130,000+ stars on its GitHub repo. It runs across a terminal CLI, a JetBrains plugin, a standalone desktop app, the web and iOS, and Slack. The VS Code extension is its primary IDE surface, and it's recommended over the raw CLI for anyone using VS Code day-to-day, per Anthropic's own IDE integrations docs.
A useful mental model: the extension is not a different product. It's the same Claude Code engine - same models, same CLAUDE.md customization, same hooks and MCP servers, same slash commands and skills - wrapped in a panel that knows where your cursor is and can render diffs inline. The extension actually bundles the claude binary; when you type into the panel, you're talking to the same agent you'd start with claude in a terminal.
If you've used Cursor or GitHub Copilot before, the framing that helps most comes from Santiago Valdarrama, who has spent a lot of time on this distinction:
"Claude Code and Codex do not replace Copilot and Cursor. First, Claude Code and Codex are agentic coding tools. They are good at following instructions and generating a ton of code at once. Second, you have Copilot, Cursor Tab, and similar AI assistants. They help with interactive development, where a human writes the code, and the tool autocompletes and suggests what to type next… Mode 1: AI writes the code, and the human copilots. Mode 2: The human writes the code, and AI copilots. These two are very different. One doesn't replace the other. Professional developers use both."
- @svpino on X, 610+ likes, 116K+ views
The VS Code extension is the autopilot, with the comfort of an IDE. That's the whole pitch.
Installing it in 60 seconds
Three things you need: VS Code 1.98.0 or newer, the extension itself, and an Anthropic login (or an API key).
- Open the Extensions view with
Cmd+Shift+X/Ctrl+Shift+Xand search "Claude Code." Or use the direct linkvscode:extension/anthropic.claude-code. In Cursor, swap the scheme:cursor:extension/anthropic.claude-code. Other VS Code forks (Devin Desktop, Kiro, the rest) can install from the Open VSX registry. - Open a file. The Spark icon (the orange ✱) appears in the editor toolbar top-right only when a file is open. Click it, or use the Activity Bar, the Status Bar's
✱ Claude Codechip, or the Command Palette (Cmd+Shift+P→ "Claude Code"). Full install walkthrough in our Claude Code install guide. - Sign in. The first launch opens a browser auth flow against your Claude account. If you'd rather use an API key, set
ANTHROPIC_API_KEYand start VS Code from a terminal withcode .so the env var is inherited - easy to miss, and the reason a lot of "why is it asking me to log in" Reddit posts exist. For deeper env-var setup, see our Claude Code environment variables guide.

The extension bundles the CLI, so you don't install claude separately. If you'd rather use the terminal anyway, just open the VS Code integrated terminal (Ctrl+/Cmd+\``) and type claude`.
The four moves that matter
Most of the panel's power lives in four interactions: the prompt box, @-mentions, diffs with permission gates, and session history. If you understand these four, the rest of the UI is decoration.
1. The prompt box and its / menu
Type into the panel like you'd type into any chat. The footer shows the line count of whatever you have selected; Claude sees it automatically. Press Shift+Enter for a new line, Enter to send. Hit / to open a command menu that lets you swap models, toggle extended thinking, check /usage, open /remote-control, manage MCP servers, hooks, memory, permissions, and plugins - per the official IDE integrations docs.
Three permission modes live in this box, switched by setting claudeCode.initialPermissionMode:
| Mode | What it does | When to use it |
|---|---|---|
Normal (default) | Asks before each edit | First few hours with the extension, or on a repo you don't know well |
Plan (plan) | Proposes changes as a markdown plan, no edits | Big refactors where you want to read the strategy before any file changes |
Auto-accept (acceptEdits) | Edits without asking | A focused session where you're babysitting the agent anyway |
Bypass (bypassPermissions) | Skip all permission checks | Sandboxed environments only - gated behind allowDangerouslySkipPermissions |
The claudeCode.initialPermissionMode setting is the one most people change first. Our permissions guide goes deeper on what each mode actually gates.
2. @-mentions tied to your selection
Highlight lines in a file, then in the panel press Option+K / Alt+K. It inserts a reference like @utils.py#2-3. Claude treats that as a hard anchor: "this exact range, in this exact file, on this exact selection." It's the single biggest workflow gap with the raw CLI, where you'd otherwise have to paste the snippet manually.
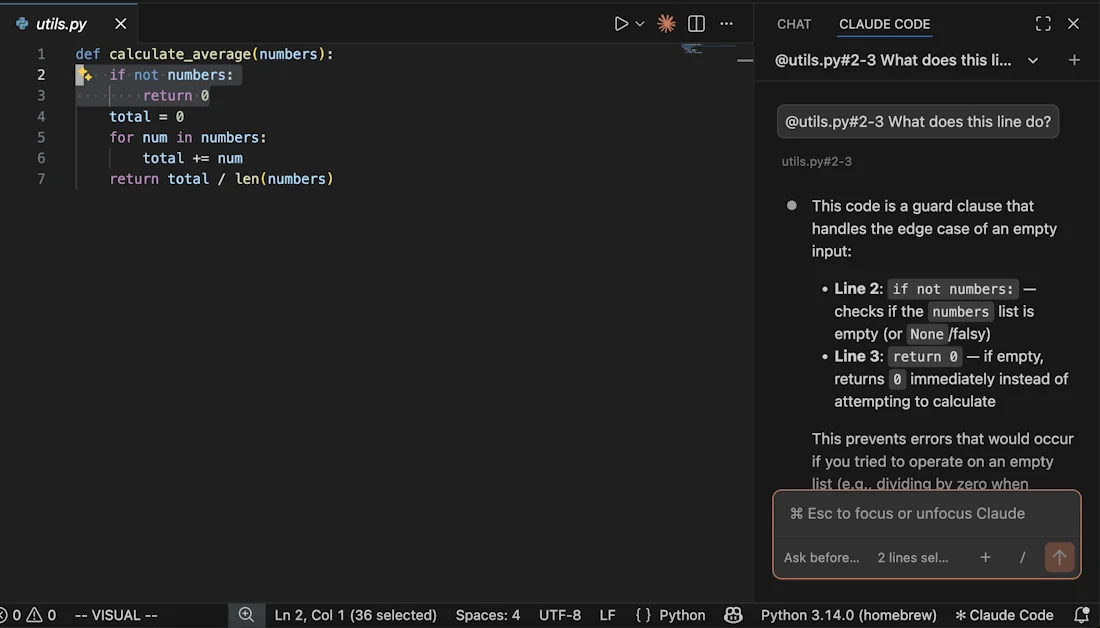
Plain @ with no selection also works: type @auth and you get fuzzy file matching. @src/components/ walks a folder. For large PDFs, you can scope to a page range. Terminal output is referenceable too with @terminal:name, where name is the integrated terminal's title.
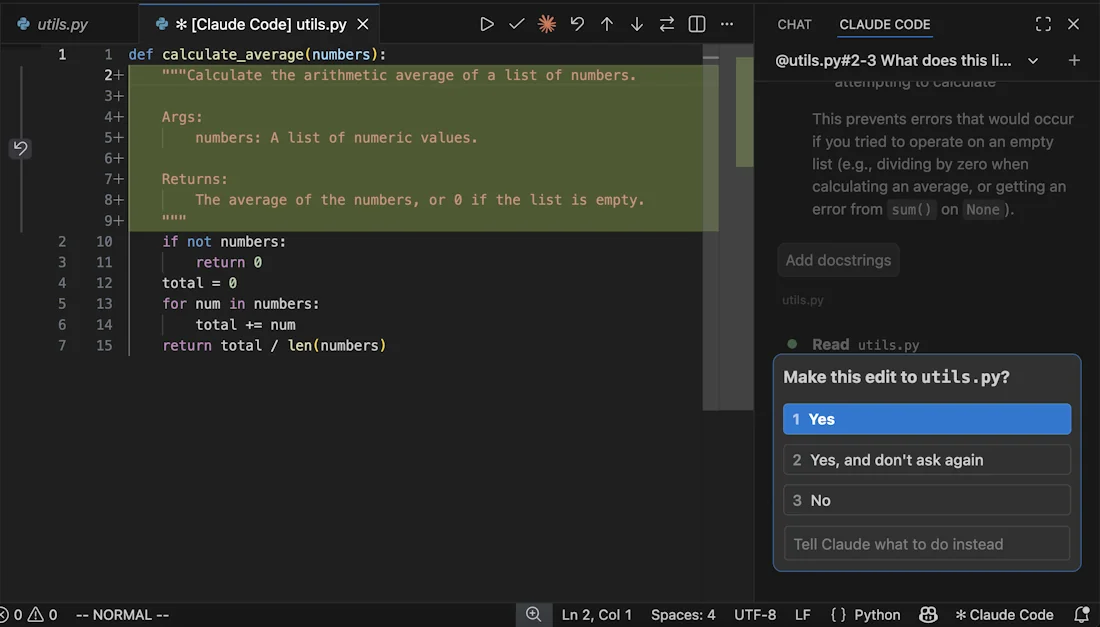
3. Diffs and the permission gate
This is where the extension genuinely beats the CLI for most people. When Claude proposes an edit, you get a real VS Code side-by-side diff, with the file's existing content on the left and the new content on the right, plus a four-button decision (Yes / Yes, don't ask again / No / Tell Claude what to do instead).
The extension also gives you checkpoints that the CLI doesn't have a great equivalent for. Hover any message in the panel and you get a rewind button with three options: fork the conversation from this point (keep code as-is), rewind code to this point (keep the conversation), or do both. For exploratory work where you're three turns into a bad direction, this is genuinely the killer feature.
4. Session history with AI-generated titles
Click Session history at the top of the panel to browse by Today / Yesterday / Last 7 days, or search by keyword. Each session gets an auto-generated title, which sounds gimmicky but is surprisingly useful when you're context-switching across a few branches. Rename or delete on hover.
If you're signed in with a Claude.ai subscription, remote sessions started from claude.ai with a GitHub repo show up under the Remote tab - click to download and continue locally. It's the mobile-to-PR workflow Anthropic keeps highlighting on the homepage, and it does work as advertised once you've wired up the GitHub permissions.
How the extension actually runs under the hood
If you've ever wondered why the extension feels less like a chat plugin and more like a piece of the editor, this is why.
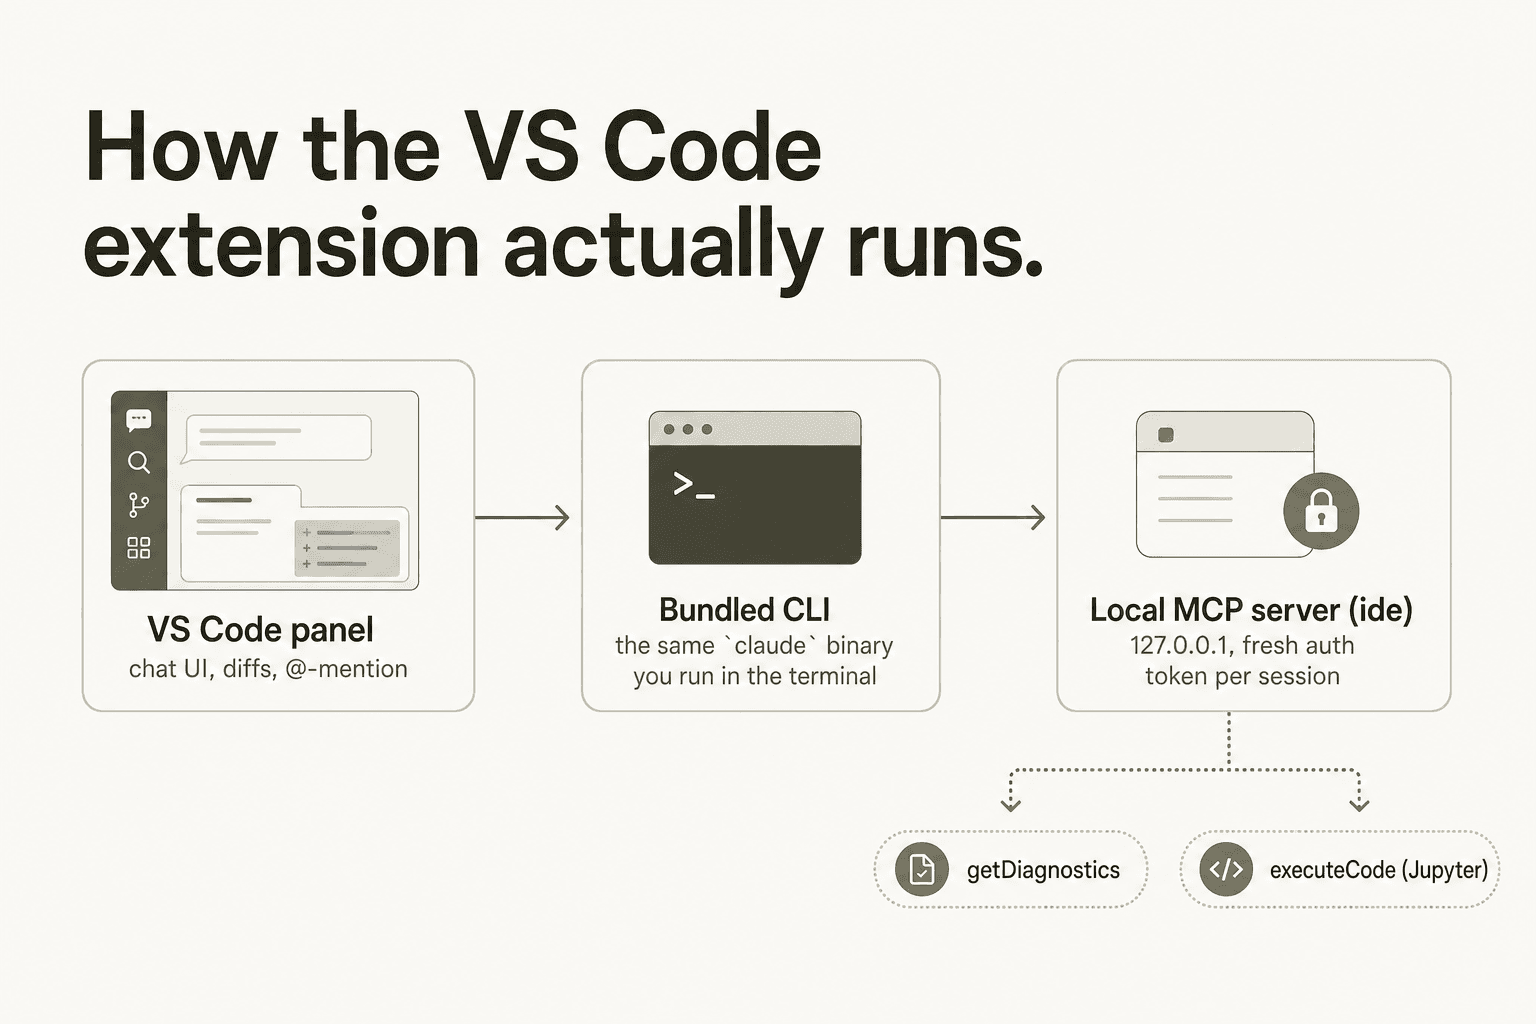
The panel runs a local MCP server called ide that the bundled CLI connects to automatically. It binds to 127.0.0.1 on a random high port with a fresh auth token per activation - see the official IDE integrations reference for the exact mechanics. Two tools become available to the model when the extension is active:
| Tool | What it does | Writes? |
|---|---|---|
mcp__ide__getDiagnostics | Returns language-server diagnostics from VS Code's Problems panel | No |
mcp__ide__executeCode | Runs Python code in the active Jupyter notebook kernel | Yes (always with a Quick Pick confirmation) |
The diagnostics tool is the quietly important one. It means Claude can read your TypeScript or Rust errors the same way you do, without you having to copy-paste them into the chat. That's a lot of small back-and-forth that just goes away.
Settings worth changing on day one
The defaults are sane, but a few settings reliably save grief. All live under Extensions → Claude Code in VS Code Settings, or in ~/.claude/settings.json. For the full reference, our settings.json complete guide walks every key.
| Setting | Default | Why you might change it |
|---|---|---|
claudeCode.initialPermissionMode | default | Set to plan for big refactors, acceptEdits for hands-off sessions |
claudeCode.preferredLocation | panel | sidebar keeps Claude on the right while you scan files on the left |
claudeCode.useTerminal | false | Flip on if you prefer a CLI-style interface in the panel |
claudeCode.respectGitIgnore | true | Leave on. Stops Claude from indexing node_modules and friends |
claudeCode.autosave | true | Auto-saves before Claude reads/writes; turn off only if you've been burned by it |
claudeCode.usePythonEnvironment | true | Activates your workspace Python env. Disable if you manage envs externally |
claudeCode.useCtrlEnterToSend | false | Lots of devs flip this on out of habit from other AI tools |
claudeCode.disableLoginPrompt | false | Enable if you're authing through Bedrock / Vertex AI / Foundry |
Two extras worth knowing:
enableNewConversationShortcut: off by default, but turning it on bindsCmd+N/Ctrl+Nto "new Claude conversation." Useful if you keep two or three threads open at once.- JSON schema autocomplete: add
"$schema": "https://json.schemastore.org/claude-code-settings.json"at the top of~/.claude/settings.jsonand VS Code will autocomplete the keys for you. Small thing; saves a lot of typo time.
Plugins, MCP, and the actual unlock
Type /plugins in the panel to open the Manage plugins interface. Two tabs: installed plugins (with enable/disable toggles plus plugins available from configured marketplaces), and the Marketplaces tab for adding plugin sources (a GitHub repo, a URL, or a local path). Our Claude Code plugin overview covers the ecosystem in depth.
For MCP, the integrated terminal is still where you add servers:
claude mcp add --transport http github https://api.githubcopilot.com/mcp/ \
  --header "Authorization: Bearer YOUR_GITHUB_PAT"
Once added, /mcp in the chat panel handles enable/disable, reconnect, and OAuth. The MCP integrations guide covers the broader landscape - Notion, Sentry, Jira, PostgreSQL, Slack, Figma - that's worth wiring in.
The Reddit and X chatter on plugins is loud for a reason. A widely-shared tweet from Suryansh frames it well:
"Most people are using Claude Code completely vanilla… which is why their experience feels messy. The real power comes from the ecosystem around it."
- @Suryanshti777 on X, 4.5K+ likes, 1.5M+ views
A vanilla-extension setup with no MCP servers, no hooks, and no skills is leaving a lot on the table. We'd genuinely budget an hour to wire up two or three plugins that match your stack - it's the single highest-leverage thing you can do after install.
The CLI vs VS Code extension question
This is the question that brings most people to this page, so let's settle it.

Here's the feature delta, straight from Anthropic's own comparison:
| Feature | CLI | VS Code extension |
|---|---|---|
| Commands and skills | All | Subset (type / to see available) |
| MCP server config | Yes | Partial (add via CLI; manage via /mcp) |
| Checkpoints | Yes | Yes |
! bash shortcut | Yes | No |
| Tab completion | Yes | No |
| Side-by-side diff viewer | Terminal-only | Yes (real VS Code diff) |
| @-mention with text selection | No | Yes |
| Session history with tabs | No | Yes |
--dangerously-skip-permissions | Yes | Behind a setting |
Multi-repo via /add-dir | Yes | Limited |
The active r/ClaudeAI thread on this exact question has 103 comments and is genuinely worth reading. The auto-summary from the mod bot captures the split well:
"The thread is pretty split… CLI loyalists stick with the terminal: more power & features - the CLI has full slash command support, better multi-repo handling (
/add-dir), specific flags (--dangerously-skip-permissions), and gets new features much faster. The extension is seen as lagging behind and feeling a bit 'abandoned.' Reliability: the extension is perceived as buggier, with users reporting issues with PATH variables, login problems… VS Code extension fans prefer it for superior UI/UX: it's widely agreed that the extension is cleaner, making it much easier to review diffs… A popular third option is to use both: run the Claude Code CLI inside the VS Code terminal."
Our take: the third option is the right one. Use the extension for the visual diff loop and the @-mention with selection - that's where it earns its place. Drop into the CLI (which is one Cmd+` away in the integrated terminal) when you need --add-dir, the bash shortcut, or any of the bleeding-edge flags that the extension hasn't caught up to yet. The CLI is also where you'll do most MCP configuration. The two surfaces share ~/.claude/settings.json and the same session store, so there's no penalty for switching mid-flow.
For the full step-by-step on running the CLI inside VS Code, see our VS Code Claude Code setup guide.
A normal edit, end-to-end
If you've never sat through one, here's what a single Claude Code edit feels like in the extension. The whole loop usually lands in 10–60 seconds.
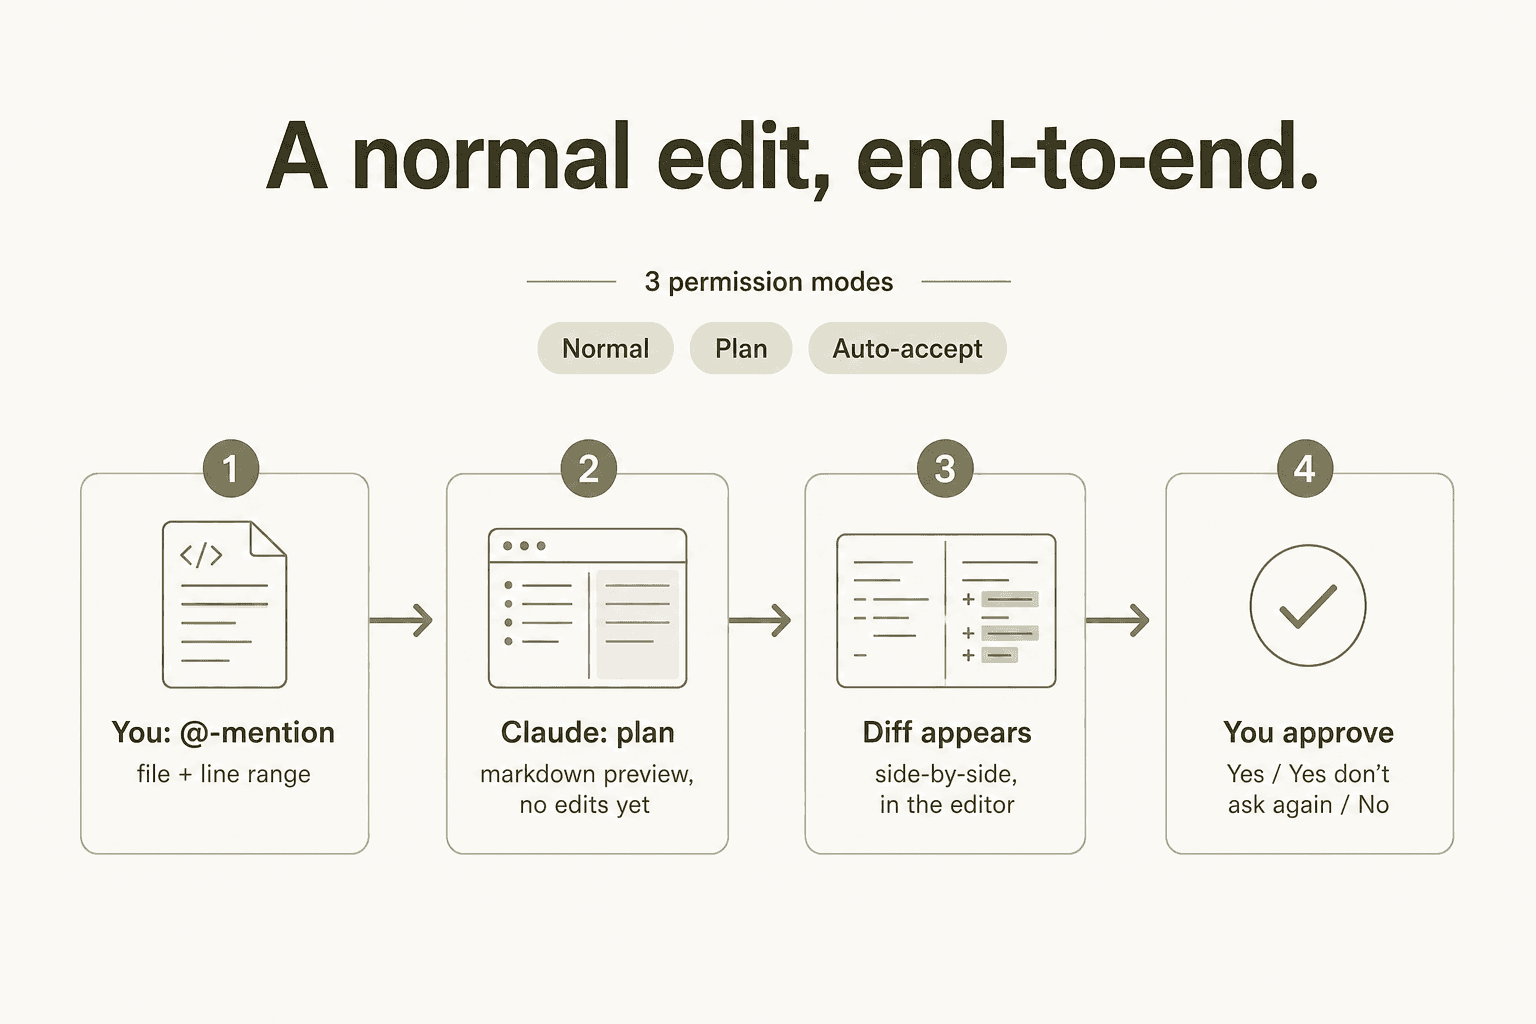
You select the lines you want changed and Option+K to insert the reference. Claude reads the file, drafts a plan in the chat (if you're in Plan mode, you stop here and read; in Normal mode, it just continues), produces a side-by-side diff, and waits for your approval. You click Yes, and the file changes on disk. Hover the message later if you want to rewind - that whole conversation is one checkpoint away.
The thing that surprises new users: when Claude has a question for you mid-edit ("which of the two formatting styles in this file should I match?"), it pauses and asks, then resumes from where it stopped. You don't have to start over.
Pricing - what plan unlocks the extension
The extension itself is free. What costs money is the Anthropic plan behind it. Full breakdown in our Claude pricing guide; here's the quick reference for what does and doesn't include Claude Code, per anthropic.com/pricing:
| Plan | Price | Claude Code? |
|---|---|---|
| Free | $0 | No |
| Pro | $17/mo annual / $20/mo | Yes |
| Max 5x | From $100/mo | Yes (5× usage vs Pro) |
| Max 20x | ~$200/mo | Yes (20× usage vs Pro) |
| Team - Standard | $20/seat/mo annual / $25/mo | Yes |
| Team - Premium | $100/seat/mo annual / $125/mo | Yes (5× usage) |
| Enterprise | $20/seat + API token usage | Yes; usage past seat billed at API rates |
API token rates if you'd rather pay per use: Opus 4.8 is $5/M input, $25/M output; Sonnet 4.6 is $3/M input, $15/M output; Haiku 4.5 is $1/M input, $5/M output. Fast mode on Opus 4.8 is 2× the standard price for 2.5× the speed.
Active promo (as of June 2026): $1,000 in Claude Code and Cowork credits for every seat that activates by July 2 - see the pricing page for terms.
Our take on which plan to pick: Pro at $17/month is the right entry point if you're trying Claude Code seriously for the first time. The catch - and Reddit will not let this one go - is that the $20 Pro plan's session limits can feel tight on intensive sessions. From a long r/ClaudeCode thread with 237 comments:
"I hit my session limit just by chatting. After that, it started consuming my API credits… I really don't understand the point of the $20 subscription model in this state."
Counterpoint from the same thread:
"Speak for yourself mate, I have the 20 dollar pro plan, and I am working full time on two projects, where Claude Code does the heavy lifting and I am hard pressed to hit my weekly limits… I start a new session for a new feature. I use Opus 4.6 for planning the feature out, Sonnet to build it. I maintain a CLAUDE.md file which I update after each session. I periodically use
/compactto keep the context window smaller."
Both takes are real. If you treat each chat as a one-shot conversation with no hygiene, the Pro plan feels small. If you compact, use a CLAUDE.md, and pick the right model per task, it goes a lot further. If you do hit the wall regularly, the $100 Max plan is the consensus next step for sustained agentic work - see our Claude Code overview for budgeting heuristics.
What real users actually flag
Beyond the pricing back-and-forth, three things keep coming up about the extension specifically.
The Spark icon disappears. This is the most common "is it broken?" thread. The icon only shows when a file is open in the editor - open any file and it comes back. If it's still missing, check VS Code is on v1.98.0 or newer, restart, then disable conflicting AI extensions (Cline and Continue are the usual culprits) and check workspace trust mode.
Login loops with API keys. If you have ANTHROPIC_API_KEY set in your shell but VS Code keeps asking you to sign in, you almost certainly opened VS Code from Spotlight or Finder rather than from a terminal. Launch with code . from a shell that has the env var, and it'll inherit.
Permission prompts that won't stop appearing. Even in auto-accept mode, the extension still gates certain bash operations. From the same r/ClaudeAI thread:
"I've recently been experimenting with both and I feel like in spite of best efforts the VS code extension still prompt me before running bash command edits. Sounds like this is a common experience? But currently I'm hybrid, running PowerShell within VS code and using the CLI tool there."
The honest fix here is to fall back to the CLI in the integrated terminal when you need true non-interactive mode. The extension is conservative by design, which is what most users want for an autonomous agent inside their editor.
Uninstall, troubleshoot, switch IDEs
- To uninstall: Extensions view → "Claude Code" → Uninstall. To wipe data too:
rm -rf ~/.vscode/globalStorage/anthropic.claude-code. - macOS Tahoe shortcut conflict: the system Game Overlay captures
Cmd+Escby default; disable it in System Settings → Keyboard → Keyboard Shortcuts → Game Controllers. - Connecting Claude to Chrome: requires Claude in Chrome v1.0.36+. Once installed,
@browser go to localhost:3000 and check the console for errorsworks as written - see the Anthropic launches Claude for Chrome write-up. - Different IDE? The JetBrains plugin has its own page in our cluster - see the JetBrains Claude Code guide - and the IDE plugins overview covers what works where.
- Other AI coding assistants worth a look: our best AI coding assistant tools roundup, the Cursor reviews piece, and the Claude vs Copilot comparison cover the wider landscape.
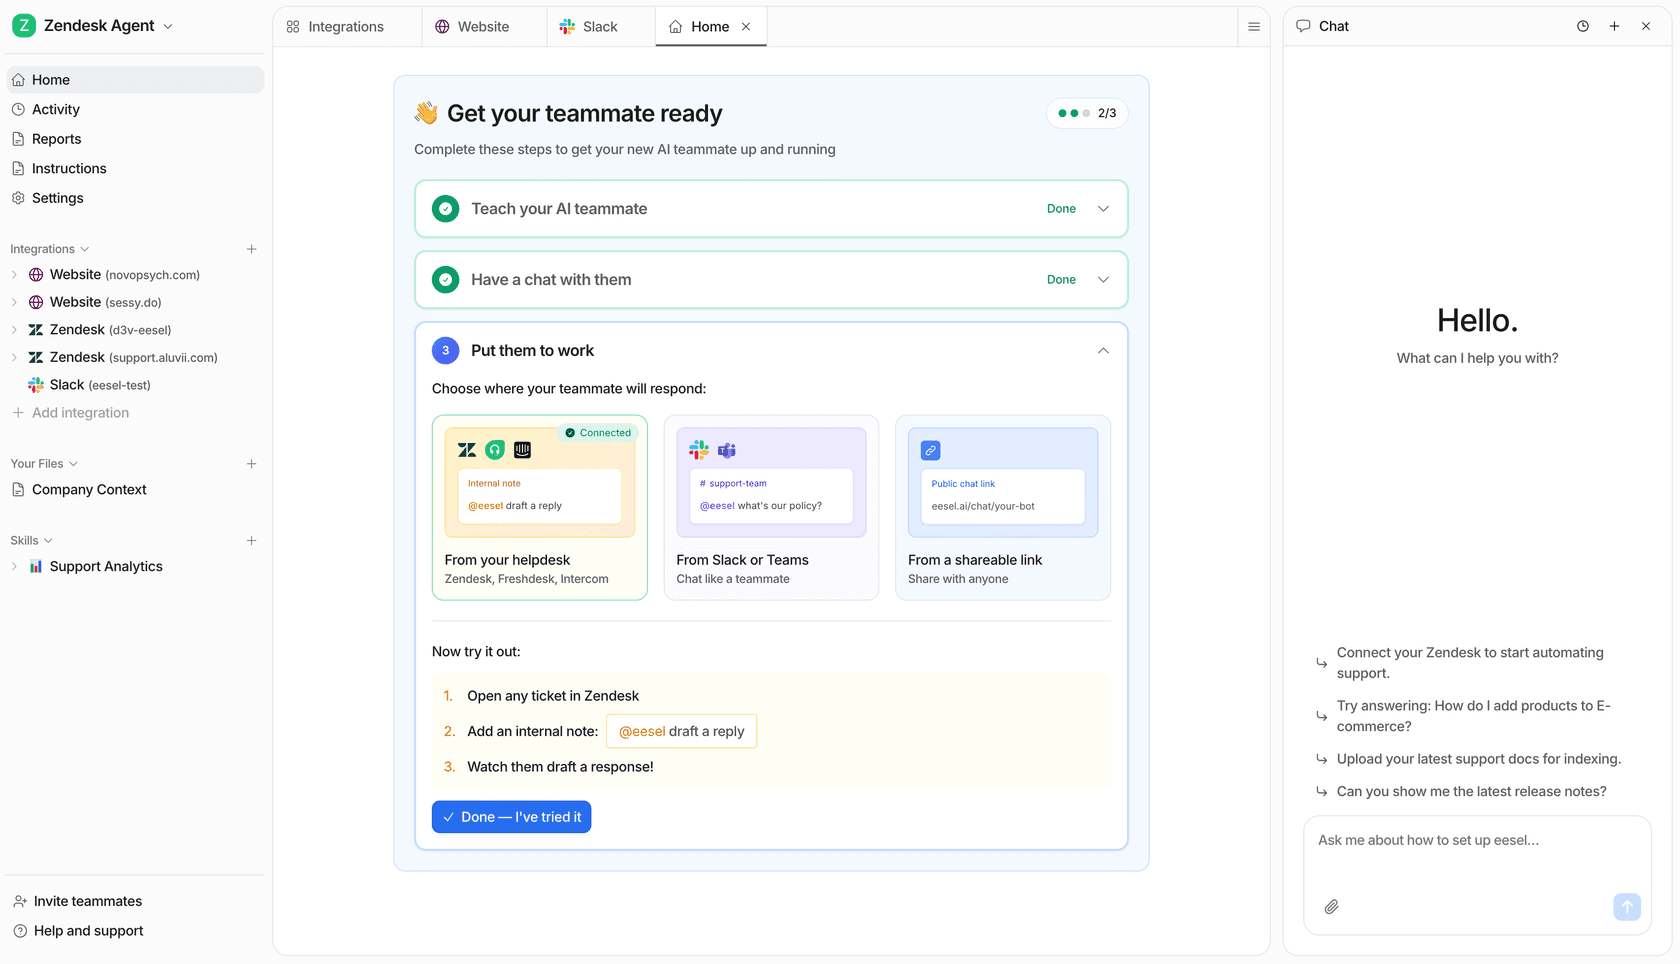
Try eesel for the agentic AI that lives outside your editor
If Claude Code is what agentic AI looks like inside your IDE, eesel is what it looks like for the rest of the business. The same pattern - describe the outcome, let the agent read context, act, and check in for permission - but inside Zendesk, Freshdesk, Slack, or Gmail, resolving tickets the way Claude Code resolves PRs.
The closest analogue: a CLAUDE.md, but for a support agent - plain-language instructions, no prompt engineering, no rebuild every time a policy changes. Onboards in minutes from your existing helpdesk history, usage-based pricing at $0.40 per ticket (no seat fees, no platform fee on self-serve), and a $50 free credit to try it.
Frequently Asked Questions
Is the Claude Code VS Code extension free?
Claude Code VS Code extension vs the CLI: which one should I use?
/add-dir, tab completion, and the ! bash shortcut. The extension wins on side-by-side diffs, @-mentions tied to your text selection, and tabbed session history. Many devs run the CLI inside the VS Code integrated terminal so they get both surfaces in one window - see our VS Code setup guide.Does the Claude Code extension work in Cursor and other VS Code forks?
cursor:extension/anthropic.claude-code. Other VS Code forks like Devin Desktop or Kiro can install it from the Open VSX registry or by searching the Extensions view. The minimum host editor version is VS Code 1.98.0 - see the official docs.How do I install the Claude Code VS Code extension?
Cmd+Shift+X (or Ctrl+Shift+X on Windows/Linux), search for "Claude Code," and install. On first launch, sign in with your Claude account through the browser flow. If you use an ANTHROPIC_API_KEY, launch VS Code from a terminal with code . so it inherits the env var. Full walkthrough in our Claude Code install guide.Can the extension run autonomously, or does it stop to ask for every change?
claudeCode.initialPermissionMode setting to acceptEdits or plan if you'd rather have Claude either auto-apply or only sketch changes for review. bypassPermissions exists too but is gated behind a separate "allow dangerous" toggle. Our permissions guide walks through each mode.
Article by
Rama Adi Nugraha
Rama is a software engineer at eesel AI with two years of experience writing about B2B SaaS, AI tools, and customer support technology. Based in Bali, Indonesia, he brings a developer's perspective to product comparisons — cutting through marketing copy to what the integrations and APIs actually do.